
In this tutorial you will learn about the commands and functionalities of the database commands within FELIX.
FELIX displays the name of the database file (as well as the directory of the file) in the title bar of the FELIX main window, confirming its selection:
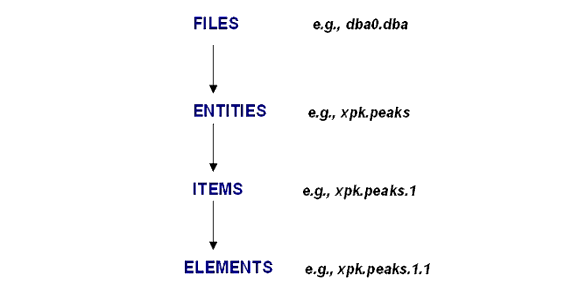
The FELIX database has a hierarchical structure which may be represented as in the following figure:

Files are composed of entities or tables, whose structures are defined using schema files. The entities are in turn composed of items, which are themselves an arrangement of elements. Begin familiarizing yourself with the dba file system by working through some of the dba utilities, as in this lesson.
2. Closing the current dba file and creating a new one
Click inside the command text field at the bottom of the FELIX window. Enter the following commands (press <Enter> after typing each command), which close the current dba file, create a new one and open it, and then list the entities in the new dba file:
> dba file close quit
> dba file build test (if you already have a dba file named test, use some other name)
> dba file open test
> dba file show
You should now see the following in the output window:
which indicates that only the default (empty) database file exists.
Select File/Open to open any 2D spectrum (e.g. the one created in Tutorial 2 ("Lesson 1: 2D processing, display, and analysis" on page 22). Select Peaks/Pick Region to pick a small region of peaks.
FELIX uses the appropriate entity (i.e., xpk.sch) and automatically renders the data.
4. Checking the database file structure and seeing how it has changed
You should now see the following in the output window:
5. Viewing the contents of the entity xpk
You should see this in the output window:
6. Inquiring about particular items and elements of the entity xpk:peaks
FELIX displays a list of the cross peak footprints.
You can also specify the display of a particular item in an entity.
Information similar to this appears in the output window:
Next you specify a particular element in an item.
The following information is displayed:
Since the element fields are named, you can use an equivalent command:
The same information is displayed as for the preceding command:
The other database utilities have the same syntactic logic.
7. Loading the value of an element
Now you load a value from the database using the name check.
The following value is displayed:
You can change the value of any element in the database using a identifying number.
You can also change the value of any element in the database by using names instead of numbers.
Begin by copying one of the existing schema, asg.sch, to a new schema with the name wrd.sch. Then edit the new schema file
Note: To locate the FELIX schema files, locate the database folder in the path where the FELIX 2004 executable is located.
C:\Program Files\Accelrys\FELIX 2004\database.
Open the database folder. Locate and open the folder called schema. Find the schema file asg.sch.
Copy the existing schema, asg.sch, to a new file named wrd.sch in your working directory using Windows Explorer. Next use Notepad to edit the new wrd.sch schema file to the following:
> c**wrd.sch
> wrd
> 5item i k 01 06 (1x,i5)
> cenpnt r k 01 10 (f10.3)
> wid r 01 10 (f10.3)
> cenppm r k 01 10 (f10.3)
> name c 32 34 (2x,a32)
9. Passing data to and getting data from a new database entity
This generates a new entity with the name weird, which is based upon the schema wrd.sch, using a single occurrence of that schema.
Both commands specify storing the string in the entity named weird, item 1, element 5 (again note that the element fields are named).
The following should be displayed:
To view any entity via tables you can use the Edit/Table command. This opens a control panel from which you can choose the entity that you would like to display in a table.
